Retour

2. Ajout de nos modèles Post et Comment ainsi que de la gem Devise pour la gestion des utilisateurs
Ensuite, générez les scaffolds pour Post et Comment :
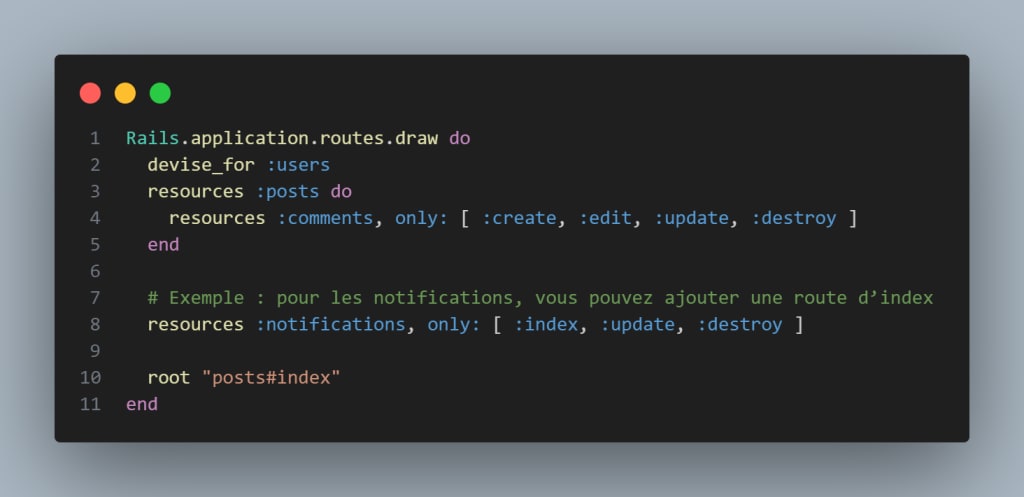
Par la suite, nous allons ajuster notre fichier config/routes.rb
3. Ajout du gem Noticed dans le Gemfile
Ouvrez le fichier Gemfile et ajoutez :
Cela va nous permettre d'avoir accès à une API unifiée pour livrer des notifications via plusieurs canaux (base de données, ActionCable, email, etc.).
Nous allons retouver notre fichier qui été généré dans : app/notifications/comment_notification.rb
Modifiez-le comme suit :
5. Ajustement des modèles
a. Dans app/models/user.rb, ajoutez l’association pour les notifications :
b. Dans app/models/comment.rb, ajoutez le callback pour déclencher la notification :
Puis créer un fichier Turbo Stream pour la méthode "create".

b. Créez app/views/notifications/_notification_counter.html.erb, le compteur de notifications :
c. Créez app/views/notifications/_notification.turbo_stream.erb , fichier Turo Stream pour streamer en temps réel les notification et le compteur :
d. Créez un fichier nommé _navbar.html.erb dans le dossier app/views/layouts/. Par exemple :
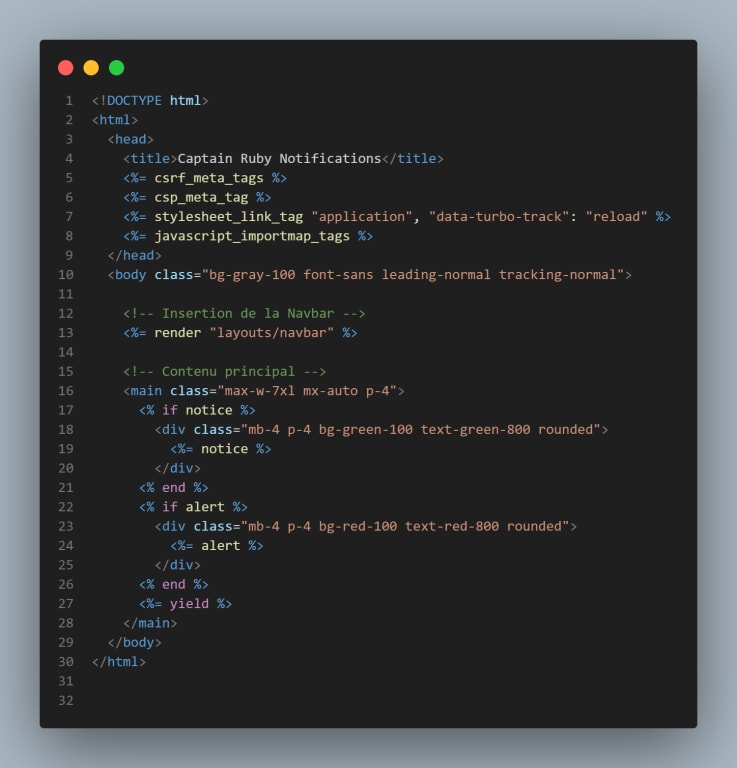
e. Ouvrez votre fichier app/views/layouts/application.html.erb et insérez-y le rendu du partial de la navbar. Par exemple, juste après l'ouverture de la balise <body> :
8. Dans app/controllers/application_controller.rb, ajoutez un before_action pour charger les notifications globalement dans l'environement si l'utilisateur est connecté :

9. Vérification et tests
Démarrez le serveur avec :
Accédez à votre application dans le navigateur avec l'url : http://localhost:3000. Vous devriez voir la navbar en haut de la page avec les liens, l’icône de notification, le compteur et la liste déroulante.
Les notifications se diffuseront en temps réel via Turbo Streams lorsque de nouveaux commentaires seront créés.
🎉Et voilà, vous êtes désormais prêts à créer des notifications en temps réel avec Rails
happy coding!

Comment intégrer des notifications en temps réel dans votre application Rails avec Noticed
Enregistrer
1
plus de 1 an
par Franci-lobbie LALANE
Tags:
#notification
#noticed
#rails
Dans le développement d’applications web modernes, les notifications jouent un rôle crucial pour informer l’utilisateur en temps réel de nouveaux événements (commentaires, mentions, likes, etc.). Cependant, il arrive que la documentation en français sur ces sujets soit obsolète ou difficile à trouver.
Dans cet article, nous allons voir comment intégrer des notifications dans une application Ruby on Rails en utilisant le gem Noticed (version 1.6). Nous verrons, étape par étape, la création d’une nouvelle application, l’installation de Noticed, la configuration des notifications via ActionCable et Turbo Streams, et enfin la mise en place d’un système de notifications en temps réel qui s’actualise sans recharger la page.
1. Création d'une nouvelle application Rails avec Tailwind pour le CSS
rails new captain_ruby_notifications --skip-active-storage --skip-action-mailbox  --css=tailwind
cd captain_ruby_notifications
2. Ajout de nos modèles Post et Comment ainsi que de la gem Devise pour la gestion des utilisateurs
Ajoutez Devise au Gemfile (ou utilisez bundle add devise) et installez-le :
bundle add devise
rails generate devise:install
rails generate devise User
Ensuite, générez les scaffolds pour Post et Comment :
rails generate scaffold Post title:string content:text
rails generate scaffold Comment content:text post:references user:references
rails db:migrate
Par la suite, nous allons ajuster notre fichier config/routes.rb
3. Ajout du gem Noticed dans le Gemfile
Ouvrez le fichier Gemfile et ajoutez :
gem "noticed", "~> 1.6"
- Puis exécutez :
bundle install
Cela va nous permettre d'avoir accès à une API unifiée pour livrer des notifications via plusieurs canaux (base de données, ActionCable, email, etc.).
Noticed simplifie aussi l’implémentation d’actualisations en temps réel (via Turbo Streams et ActionCable).
4. Génération du modèle Notification et de la classe de Notification (Notifier)
Noticed stocke les notifications dans la base de données. Pour générer le modèle nécessaire, utilisez la commande :
4. Génération du modèle Notification et de la classe de Notification (Notifier)
Noticed stocke les notifications dans la base de données. Pour générer le modèle nécessaire, utilisez la commande :
rails generate noticed:model Notification
rails generate noticed:notification CommentNotification
rails db:migrate
Nous allons retouver notre fichier qui été généré dans : app/notifications/comment_notification.rb
Modifiez-le comme suit :
class CommentNotification < Noticed::Base
  deliver_by :database
  deliver_by :action_cable, format: :to_action_cable

  # On attend un paramètre :message (chaîne de caractères)
  param :message

  # Après la livraison, nous diffusons la notification via Turbo Streams
  after_deliver :broadcast_notification

  def to_database
    { message: params[:message] }
  end

  def to_action_cable
    { title: "Nouveau commentaire", message: params[:message], id: record.id }
  end

  private

  def broadcast_notification
    recipient.broadcast_prepend_later_to(
      "notifications_#{recipient.id}_dropdown_list",
      target: "notification-dropdown-list",
      partial: "notifications/notification",
      locals: { notification: self.record }
    )

    recipient.broadcast_replace_later_to(
      "notifications_#{recipient.id}_counter",
      target: "notification-counter",
      partial: "notifications/notification_counter",
      locals: { user: recipient }
    )
  end
end
5. Ajustement des modèles
a. Dans app/models/user.rb, ajoutez l’association pour les notifications :
class User < ApplicationRecord
  devise :database_authenticatable, :registerable,
         :recoverable, :rememberable, :validatable

  has_many :posts, dependent: :destroy
  has_many :comments, dependent: :destroy

  # Note : le modèle est généré sous le nom Notification
  has_many :notifications, as: :recipient, dependent: :destroy, class_name: "Notification"
end
b. Dans app/models/comment.rb, ajoutez le callback pour déclencher la notification :
class Comment < ApplicationRecord
  belongs_to :post
  belongs_to :user

  validates :content, presence: true

  # Après création, déclencher la notification (sauf si l'auteur commente son propre article)
  after_create_commit :notify_post_user

  private

  def notify_post_user
    return if post.user == user

    CommentNotification.with(
      message: "#{user.email} à commenté votre article : #{post.title}"
    ).deliver_later(post.user)
  end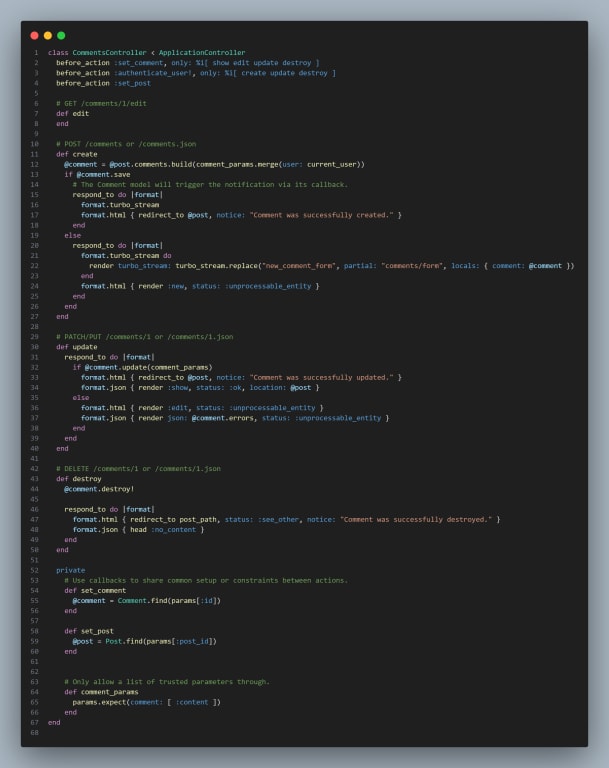
end- 6. Une fois les modèles définis, nous allons maintenant mettre à jour le contrôleur des commentaires (CommentController.rb)
- Voici un exemple mis à jour pour app/controllers/comments_controller.rb qui gère le streaming via Turbo Streams :
Puis créer un fichier Turbo Stream pour la méthode "create".
code app/views/comments/create.turbo_stream.erb
7. Mise en place des vues pour les notifications
a. Créez le fichier app/views/notifications/_notification.html.erb, qui sera le corps de nos notifications :
a. Créez le fichier app/views/notifications/_notification.html.erb, qui sera le corps de nos notifications :
<div id="notification-<%= notification.id %>" class="notification group relative flex flex-col sm:flex-row items-start sm:items-center bg-white hover:bg-gray-50 border border-gray-100 rounded-lg p-4 mb-2 shadow-sm transition-all duration-300 ease-in-out">
  <div class="flex-grow w-full sm:pr-4">
    <p class="text-gray-800 text-sm sm:text-base mb-1.5">
      <%= notification.params[:message] %>
    </p>
    <p class="text-xs text-gray-500 mb-2">
      <%= time_ago_in_words(notification.created_at) %>
    </p>
  </div>
</div>
b. Créez app/views/notifications/_notification_counter.html.erb, le compteur de notifications :
<% unread_count = user.notifications.unread.count %>
<% if unread_count.positive? %>
  <span class="absolute -top-1 -right-1 bg-red-500 text-white text-xs font-bold px-1.5 py-0.5 rounded-full">
    <%= unread_count %>
  </span>
<% end %>
c. Créez app/views/notifications/_notification.turbo_stream.erb , fichier Turo Stream pour streamer en temps réel les notification et le compteur :
<%= turbo_stream.prepend "notification-dropdown-list", partial: "notifications/notification", locals: { notification: notification } %>
<%= turbo_stream.replace "notification-counter", partial: "notifications/notification_counter", locals: { user: notification.recipient } %>
d. Créez un fichier nommé _navbar.html.erb dans le dossier app/views/layouts/. Par exemple :
<!-- app/views/layouts/_navbar.html.erb -->
<nav class="bg-white shadow">
  <div class="max-w-7xl mx-auto px-4">
    <div class="flex justify-between items-center py-4">
      <!-- Logo et liens principaux -->
      <div class="flex items-center space-x-4">
        <a href="<%= root_path %>" class="flex items-center text-gray-700">
          <span class="font-bold text-xl">Captain Ruby Notifications</span>
        </a>
        <div class="hidden md:flex items-center space-x-1">
          <%= link_to "Articles", posts_path, class: "py-2 px-3 text-gray-700 hover:text-gray-900" %>
          <!-- Ajoutez d'autres liens si nécessaire -->
        </div>
      </div>

      <!-- Section droite : notifications et authentification -->
      <div class="flex items-center space-x-4">
        <% if user_signed_in? %>
          <div class="relative group">
            <div class="cursor-pointer p-2">
              <!-- Icône de notifications -->
              <svg class="h-6 w-6 text-gray-700" fill="none" viewBox="0 0 24 24" stroke="currentColor">
                <path stroke-linecap="round" stroke-linejoin="round" stroke-width="2"
                      d="M15 17h5l-1.405-1.405A2.032 2.032 0 0118 14.158V11a6 6 0 10-12 0v3.159c0 .538-.214 1.055-.595 1.436L4 17h5m6 0v1a3 3 0 11-6 0v-1"/>
              </svg>
              <!-- Compteur de notifications -->
              <%= turbo_stream_from "notifications_#{current_user.id}_counter", id: "notification_counter_stream" %>
              <div id="notification-counter">
                <%= render "notifications/notification_counter", user: current_user %>
              </div>
            </div>
            <!-- Liste des notifications -->
            <%= turbo_stream_from "notifications_#{current_user.id}_dropdown_list", id: "notification_dropdown_stream" %>
            <div id="notification-dropdown-list" class="absolute right-0 mt-2 w-80 bg-white shadow-lg rounded hidden group-hover:block z-50">
              <div class="p-4 space-y-2">
                <% if @notifications.any? %>
                  <%= render @notifications.order(created_at: :desc) %>
                <% else %>
                  <p class="text-gray-500">Aucune notification pour le moment.</p>
                <% end %>
              </div>
            </div>
          </div>
          <%= link_to "Déconnexion", destroy_user_session_path, method: :delete, class: "py-2 px-3 text-gray-700 hover:text-gray-900" %>
        <% else %>
          <%= link_to "Connexion", new_user_session_path, class: "py-2 px-3 text-gray-700 hover:text-gray-900" %>
          <%= link_to "Inscription", new_user_registration_path, class: "py-2 px-3 bg-yellow-400 text-yellow-900 rounded hover:bg-yellow-300 transition duration-300" %>
        <% end %>
      </div>
    </div>
  </div>
</nav>
e. Ouvrez votre fichier app/views/layouts/application.html.erb et insérez-y le rendu du partial de la navbar. Par exemple, juste après l'ouverture de la balise <body> :
8. Dans app/controllers/application_controller.rb, ajoutez un before_action pour charger les notifications globalement dans l'environement si l'utilisateur est connecté :
9. Vérification et tests
Démarrez le serveur avec :
bin/dev
Accédez à votre application dans le navigateur avec l'url : http://localhost:3000. Vous devriez voir la navbar en haut de la page avec les liens, l’icône de notification, le compteur et la liste déroulante.
Les notifications se diffuseront en temps réel via Turbo Streams lorsque de nouveaux commentaires seront créés.
🎉Et voilà, vous êtes désormais prêts à créer des notifications en temps réel avec Rails
happy coding!
Laissez un commentaire
Se connecterpour laisser un commentaire.
Partager cet article
Diffusez ce contenu à votre réseau
Comment intégrer des notifications en temps réel dans votre application Rails avec Noticed
Par Franci-lobbie LALANE • plus de 1 an
Lien copié dans le presse-papier!